How authentication works with Micronaut Security

Have you ever wondered how Micronaut Security internally works? Well, I did and here is want I have found. Hope you enjoy it.
I'm a visual person, meaning I love pictures or any other visuals to understand a certain topic. Recently I had to enable Basic Authentication within a Micronaut 3.6.x application. The nice thing is, that I simply had to apply the following two dependencies to my Gradle build.
depdendencies {
	annotationProcessor("io.micronaut.security:micronaut-security-annotations")
	implementation("io.micronaut.security:micronaut-security")
    // ... other dependencies omitted
}By adding these two dependencies, Micronaut Security is part of your application. As a next step I needed to turn on the security feature and secure the API paths.
micronaut:
  application:
    name: artinaut
  security:
    enabled: true # turn on Micronaut Security
    basic-auth:
      enabled: true # enable basic authentication (default is: true)
    intercept-url-map: # Secure the API
      - pattern: /api/v1/**
        access:
          - ADMIN
      - pattern: /repos/**
        access:
          - isAnonymous()
- isAuthenticated()HTTP Request with path /api/v1/** automatically require an authenticated user having the role ADMIN. And HTTP requests to /repos/** are available to the public. So how do I tell Micronaut Security about my users and their roles? The answer is that I need to provide an AuthenticationProvider. So here is what I did.
- Pick the username from the
AuthenticationRequest. - Try to read the user from the database using the username.
- Comparing the hashed passwords and either return a successful or a failed
AuthenticationResponse.
@Singleton
@RequiredArgsConstructor
@Slf4j
public class MyAuthenticationProvider implements AuthenticationProvider {

  private final UserService userService;
  private final PasswordEncoder passwordEncoder;

  @Override
  public Publisher<AuthenticationResponse> authenticate(
      HttpRequest<?> httpRequest, AuthenticationRequest<?, ?> authenticationRequest) {
    return Flux.create(
        emitter -> {
          String identity = (String) authenticationRequest.getIdentity();
          UserDto user = userService.findUser(identity).orElse(null);

          if (user != null) {

            if (passwordEncoder.matches(
                (String) authenticationRequest.getSecret(), user.password())) {

              final Set<String> roles =
                  user.groups().stream()
                      .map(GroupDto::roles)
                      .flatMap(Collection::stream)
                      .map(RoleDto::name)
                      .collect(Collectors.toSet());
              emitter.next(AuthenticationResponse.success(identity, roles));
            } else {
              log.debug(
                  "Password does not match for user «{}» (user id «{}»)", identity, user.id());
              emitter.next(AuthenticationResponse.failure());
            }

          } else {
            emitter.next(AuthenticationResponse.failure());
          }
          emitter.complete();
        },
        FluxSink.OverflowStrategy.ERROR);
  }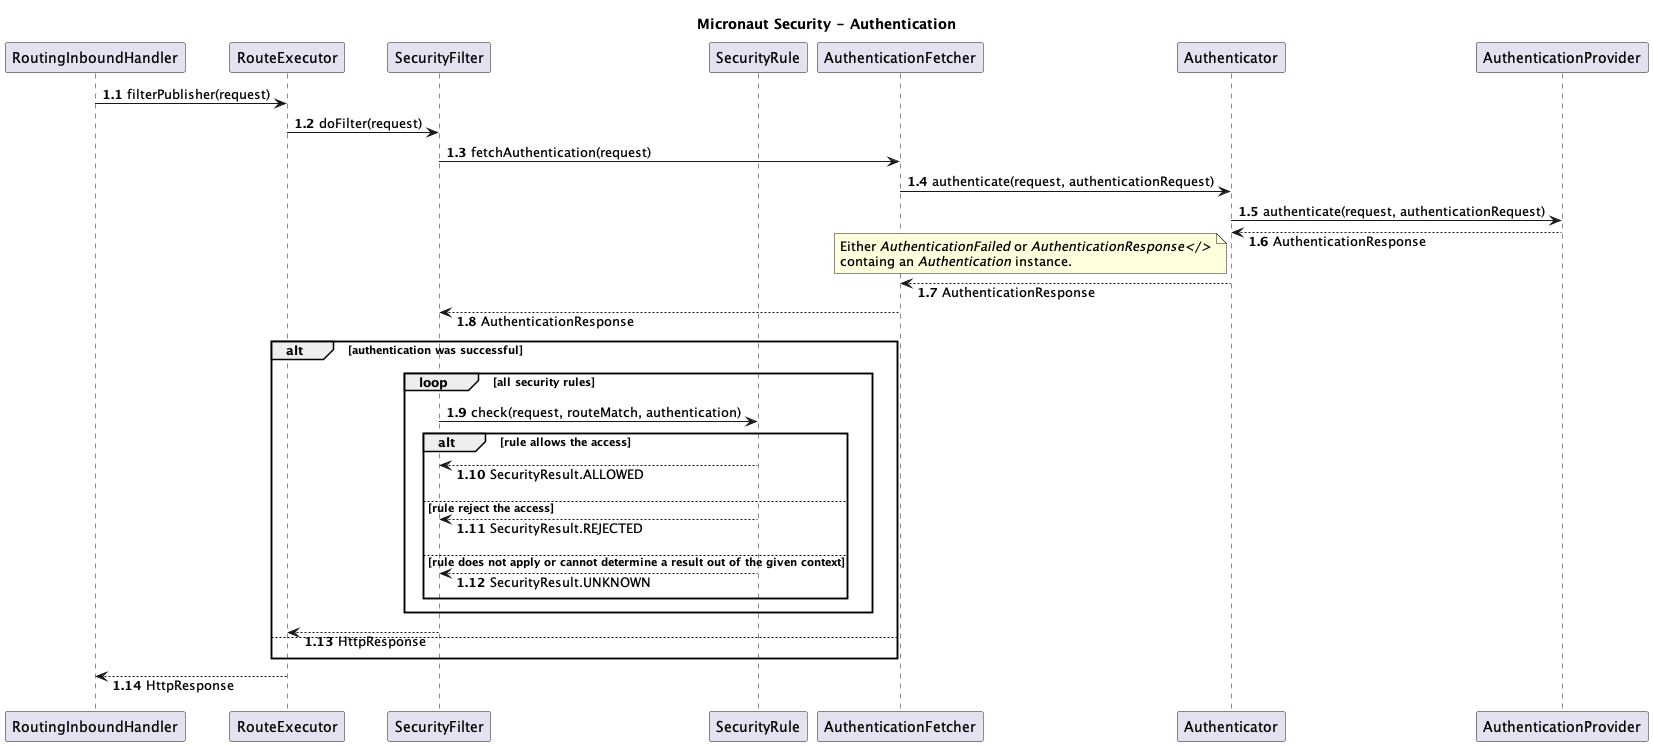
}Easy as pie, thank you Micronaut. It works! But wait, I want to dig in deeper. What else is involved? Since Micronaut does not rely on reflection their source code is very easy to read and debug. I ended up with the following, simplified sequence diagram. It explains what other participants are involved in the authentication process, even before my AuthenticationProvider gets invoked.
I hope you liked it. Thank you for reading.
